Product Details
Product Description
Product Description
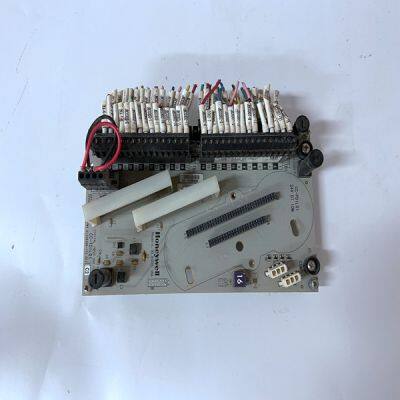
Brand:Honeywell
Type:CC-TDIL01
Origin:the United States
Warranty: 365 days
Colour: new/used
Shipping method: Courier delivery
Products are widely used in metallurgy, petroleum, glass, aluminum manufacturing, petrochemical industry, coal mine, papermaking, printing, textile printing and dyeing, mechanical, electronic manufacturing, automobile manufacturing, plastic machinery, electric power, water conservancy, water treatment/environmental protection, boiler heating, energy, power transmission and distribution and so on.
Spare parts spare parts, the main DCS control system of PLC system and the robot system spare parts,
Brand advantage: Allen Bradley, BentlyNevada, ABB, Emerson Ovation, Honeywell DCS, Rockwell ICS Triplex, FOXBORO, Schneider PLC, GE Fanuc, Motorola, HIMA, TRICONEX, Prosoft etc. Various kinds of imported industrial parts
Installation Instructions The following sections discuss the installation of IndustryPacks (IPs) on the MVME162, the installation of the MVME162 into a VME chassis, and the system considerations relevant to the installation. Before installing IndustryPacks, ensure that the serial ports and all header jumpers are configured as desired. IP Installation on the MVME162 Up to four IndustryPack (IP) modules may be installed on the MVME162. Install the IPs on the MVME162 as follows: 1. Each IP has two 50-pin connectors that plug into two corresponding 50- pin connectors on the MVME162: J2/J3, J7/J8, J13/J14, J18/J19. See Figure 2-1 for the MVME162 connector locations. – Orient the IP(s) so that the tapered connector shells mate properly. Plug IP_a into connectors J2 and J3; plug IP_b into J7 and J8. Plug IP_c into J13 and J14; plug IP_d into J18 and J19. If a double-sized IP is used, plug IP_ab into J2, J3, J7, and J8; plug IP_cd into J13, J14, J18, and J19. 2. Four additional 50-pin connectors (J6, J5, J17, and J16) are provided behind the MVME162 front panel for external cabling connections to the IP modules. There is a one-to-one correspondence between the signals on the cabling connectors and the signals on the associated IP connectors (i.e., J6 has the same IP_a signals as J2; J5 has the same IP_b signals as J7; J17 has the same IP_c signals as J13; and J16 has the same IP_d signals as J18. – Connect user-supplied 50-pin cables to J6, J5, J17, and J16 as needed. Because of the varying requirements for each different kind of IP, Motorola does not supply these cables. – Bring the IP cables out the narrow slots in the MVME162 front panel and attach them to the appropriate external equipment, depending on the nature of the particular IP(s).
MVME162 Module Installation With EPROM and IndustryPacks installed and headers properly configured, proceed as follows to install the MVME162 in the VME chassis: 1. Turn all equipment power OFF and disconnect the power cable from the AC power source. Caution Inserting or removing modules while power is applied could result in damage to module components. ! WARNING Dangerous voltages, capable of causing death, are present in this equipment. Use extreme caution when handling, testing, and adjusting. 2. Remove the chassis cover as instructed in the user’s manual for the equipment. 3. Remove the filler panel from the card slot where you are going to install the MVME162. – If you intend to use the MVME162 as system controller, it must occupy the leftmost card slot (slot 1). The system controller must be in slot 1 to correctly initiate the bus-grant daisy-chain and to ensure proper operation of the IACK daisy-chain driver. – If you do not intend to use the MVME162 as system controller, it can occupy any unused double-height card slot. 4. Slide the MVME162 into the selected card slot. Be sure the module is seated properly in the P1 and P2 connectors on the backplane. Do not damage or bend connector pins. 5. Secure the MVME162 in the chassis with the screws provided, making good contact with the transverse mounting rails to minimize RF emissions. 6. Install the MVME712 series transition module in the front or the rear of the VME chassis. (To install an MVME712M, which has a double-wide front panel, you may need to shift other modules in the chassis.) 7. On the chassis backplane, remove the INTERRUPT ACKNOWLEDGE (IACK) and BUS GRANT (BG) jumpers from the header for the card slot occupied by the MVME162.
>>
Trending Camping Custom 400ml Private Label Tumblers Stainless Steel Cups Custom Logo
>>
Cheap Price Yarn Spinning Machine Paper Cone
>>
GE IC752SPL013
>>
Non Woven Document Bag
>>
Golde Mirror Color Aluminum Composite Panel Exterior Wall Cladding Panel ACP
>>
Wholesale Original Refurbished Mobile Phone for No KIA 230 High Quality Mobile Accessories
>>
Luxury Wedding Centerpiece Vase Home Goods Antique White Ceramic European Vase For Living Room
>>
Pure half high collar plus velvet thick sweater women winter 2021 new Korean version of the embroidered villain sweater women's pullover loose bottoming shirt top 102201 white M (100-110)
>>
Pntek Irrigation System Water Timer Digital Timer for Garden
>>
Taijia UTG21-BE NON-contact Explosion-proof Type Digital Ultrasonic Transmitter Tank Liquid Level Meter
>>
Hy-049W White ATM Computer Case Desktop PC Case
>>
Timing Chain for Audi A3 A4 A6 2.0T OEM 06D109229A 06D109229B TC1508
>>
Garden Tools Cutting Grass 58cc Skid Steer And Grass Trimmer Brush Cutter
>>
Cheap Android USB Bluetooth WiFi Interface 4*6 110mm Thermal Barcode Shipping Waybill Label Printer
>>
Good Quality Plasma Cutting Tables Hyperterm CNC Plasma Cutting Machine Sheet Metal Plasma Cutter for Sale
>>
Australia standard aluminum sliding window glass sliding window
>>
Bto Factory Price Luxury Sanitary Ware Ceramic Sink Above Counter Art Basin Bathroom Sink Lavabo Table Top Wash Art Wash Basin
>>
Hot Sale Wholesale Price Modern Ergonomic Design Gaming Chair
>>
UV-LED Curing System (310nm/365nm/395nm/405nm) -UV LED
>>
Japanese OPC Drum for Ricoh MP4000 4000b 5000 5000b 4001g 4002 5001g 5002